Configuring the RFgen Application Database
In order to provide a database for storing and maintaining your RFgen Mobile Applications (which help run your Transactions), you need to connect to a database application/server/system to your RFgen server/system.
From the Mobile Development Studio or Mobile Unity Platform Console: Click on Configuration > Application Database.

Data Source Configuration Values
By default, a Configuration File called ‘RFgen.rfc’, defines the profile of the solution database, as shown below.

For details on how to connect to a RFgen Application Database, see To Connect to an Application Database.
The System / Company Id field is used to describe the owner of the configuration file. Since there are many configuration files referencing different databases for different customers or copies of the same customer's database, this field acts as the description.
An ‘Encryption Key entry provides users the ability to encrypt their Application Database. This feature allows the database to be locked so that users may not view or modify Application objects or VBA scripts. When active, a unique key may be entered in the Application Database selection window to lock, encrypt, unlock, or decrypt the database.
- To encrypt the database: Enter a key (e.g. ‘abcdef’) in the Encryption Key textbox, and click the + icon.
- To lock the database: Display the panel again, remove the key and click ‘Save’. The database is now locked. Applications will execute but may not be accessed.
- To unlock the database: display the panel and again enter the key, click ‘Save’. The database will be unlocked.
- To decrypt the database: Enter the key, click the Encrypt button and click ‘Save’. The database will be decrypted and unlocked. You must not export encrypted applications to a non-encrypted MDB. The server will prompt for the password and decrypt the exported application.
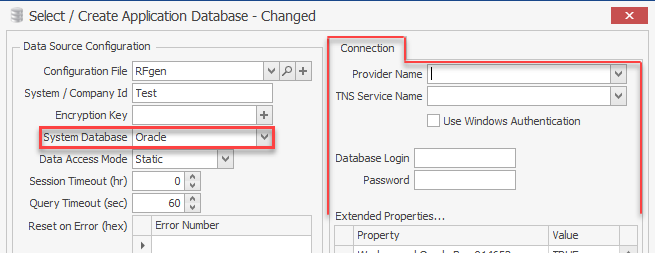
The System Database drop down field selects which type of database is to be used to host the solution objects.
The server supports Access, SQLite, SQL Server and Oracle as database containers. The solution stores the information to connect to these databases in an “rcf” file. You can also select these rfc files when exporting / importing to that database container.
Data Access Mode sets the cursor to either Static or Dynamic when retrieving data from the database. Usually, Static is best because it is fast and safe. However, if you have a database like Pervasive that will actually make a copy of the data from the database system to the RFgen system when using a static cursor, you can change this option to Dynamic, so performance will not suffer. Internally, this sets the cursor option to either adoOpenStatic or adoOpenDynamic.
The Session Timeout value (in hours) will disconnect and reconnect to the database at the specified interval. This may be required if the database is configured to not allow a connection that never times out.
The Query Timeout specifies how long the server should wait before giving up on the ODBC driver to come back with a response.
Reset on Error is a list of hex values that if returned by the ODBC driver will cause a reset of the connection. The process for adding a value is to first get the error number from the error log. Example: the error log shows -21456327. Use the Windows calculator in Programmer mode, select Dec and Dword options, enter the number and if you need the negative sign use the ± button to change its sign. Then click the Hex option. You should get: FEB89A39. Enter this value into the box with a “0x” prefix like: 0xFEB89A39
Connection Tab
The System Database changes the configuration fields in the Connection Tab.
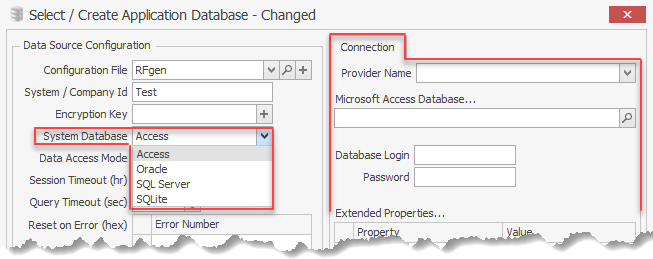
The Provider Name selection will depend on the type of database you want to use. All provider options must already exist on the server to be used .
For an Access database, select the appropriate Provider Name for the type of system (32 bit or 64 bit). The Microsoft Access Database path, Database Login, Password and Extended Properties are then used to make the connection. In the case of Access most of these fields are not necessary.
For an Oracle database, an ODBC is not used. The TNS Server Name points to the Oracle server. Also specify the Provider Name and review the Extended Properties for accuracy. The Use Windows Authentication option will take advantage of the Active Directory when connecting to the database.
For SQLite database connections just specify the DB file itself. There are no other settings. You can specify a location and name that does not exist and clicking the Test Connection button will create the database for you.
Click Test Connection to verify connectivity. If the database has not already been setup to support the solution tables they will be created at this time.
Save will also create what is necessary but won’t test the connection. Clicking the Test Connection and/or Save button will check if the database came from an older release and ask if you want it upgrade.