Configuring the Host Connection
In the Mobile Development Studio, click on Enterprise Connections > Add New Enterprise Connection > Add New Screen Mapping Connection. The following window will appear.
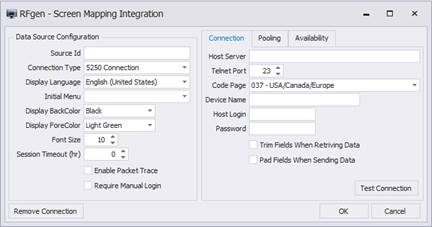
The first entry is the Source Id used to reference the data connection only. This can have any value but spaces and extended characters are not recommended.
Choose the Connection Type (VT220, TN5250 or TN3270); i.e., the protocol used to communicate with your host system. Notice that there is an additional option called Console Application. This type is designed to launch a console application rather than use a telnet server and then pass that display through the server to the device using the HostScreen prompt control. One example would be the SAP console application (SAPCNSL.EXE) running on the server and being displayed and allowing interaction with the user on a mobile device. Simply specify a process or executable name to run and any passing parameters necessary.
The preferred option is UTF-8 but if a legacy system’s output is language specific then the Display Language field should be changed to make the screen render correctly. The Language field can be left as (Default) if a code page is specified or if UTF-8 is used.
Preferences for the emulation screen include the Back Color, Fore Color (the color of the font) and Font Size. These are only for development since the screens are hidden during production.
The Session Timeout value (in hours) will disconnect and reconnect to the legacy server at the specified interval. This may be required if the legacy server is configured to not allow a connection that never times out.
In the case of communication errors the Enable Packet Trace option can be set and a trace log of the communication will be captured. This is used by support staff to diagnose issues on behalf of the customer. Please contact support if this switch is necessary.
If the Require Manual Login is checked, a connection request is created between the user and the ERP system. If this box is unchecked, the user login uses the ERP connection between RFgen and the ERP system.
Connection Tab
Next, type in the Host Server name or IP address. The Telnet Port is the port that the server uses to communicate with your host. The default for a telnet server is port 23.
If TN5250 or TN3270 are selected, you may enter a Code Page for specifying the language being used in the protocol and an IBM Device Name for the host system. Code pages were selected for loading when you loaded the screen mapping software. These fields are hidden in the VT setup.
For VT220 the Data Stream field can be set to either Standard or UTF-8 to accommodate the type of packet data coming from the host system.
When using the connection type 3270 or 5250, the Device Name field is designed to make each connected device appear unique to the host system. Leaving it blank, the host system will not distinguish between the connecting clients. Fill this field in with a name and the server will automatically add a three digit, zero padded number to each client so the host system will see each connecting session as a unique device.
The Host Login and Password fields are used only if SSH is used when connecting to the host system. Under the VT220 options, if Connect via SSH is checked then the Host Login and Password are required.
Trim Fields When Retrieving Data set to enabled will auto trim spaces from the host output fields. If a variable is defined for a section of the host screen (like where error messages are displayed), this feature will trim the text for easier use in message boxes, for example.
The Pad Fields When Sending Data option when enabled will use spaces to pad any input. A variable defined for a region of the host screen where input will take place also has a length property assigned at the time the field was defined. If the data is 3 characters, but is placed in a host screen field designed for 10 maximum characters, the server can pad the input data to fill up the host screen input field.
There are some additional properties for the VT220 mode only. Echo Characters Locally means that the server will print the typed characters on the telnet screen because the host is accepting the keystrokes but not showing them to the user. Wrap Text at End of Line will force the server to place the additional text on the next available line if it doesn’t fit in the current field. Most host system will do this automatically. Destructive Backspace means that the server will receive a backspace command and apply it to the screen as a command that removes the last character. Some systems would move the cursor but not remove the character. Send Whole Key Packets forces the server to submit keystrokes in one packet instead of two in some cases. Most host systems already support keystrokes coming in as one or more packets. Send Return + Line Feed will add a carriage return plus a line feed to the Enter keystroke when communicating with the host. Connect via SSH will establish an SSH (secure) connection to the host from the server. If this option is turned on then the SSH User Name and Password fields will be required.
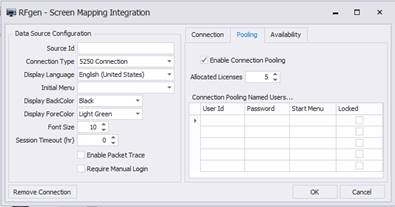
Pooling Tab
Connection Pooling can be enabled and the maximum connections allowed in the pool can be selected. This selection will determine how the server and its clients will interact with your host system.
The options for the Pooling Status are:
Disabled – Setting connection pooling to disabled will cause the server to spawn a connection to the host system for each active mobile device. Each connection will be linked to a particular device on a one-to-one basis, and will be shut down when that device disconnects. Note: there is no limitation on the number of connections allowed.
Enabled – Setting connection pooling to Enabled will cause the server to spawn a single connection to your host system. As each device requires access to the host system, they will go to the pool and retrieve one of the available connections. When they are finished, the device will release the connection back to the pool. If no connections are available, the server will start a new connection (up to the specified maximum) and add it to the pool. After 10 minutes of non-use, an opened pooled connection will be terminated releasing resources on the server and potentially licenses on the host system. Keep in mind that unless the SM.BeginTrans and SM.CommitTrans commands are used, it would be possible for one user to position the screen in one place while another user also uses that pooled connection to perform their tasks causing both users to get failures.
The Connection Pooling Named Users grid dictates how each host session is started. You may also override the default settings by configuring a specific pooled session separately.
Session - Each of the individual pooled connections are listed separately. This provides for specific settings for each connection.
User Id- If the host system requires that unique names be used or creating multiple logins with the same user is prevented, each pooled connection can have its own user ID. Session, user, and password information can be obtained at runtime with the commands SM.SessionUser, SM.SessionPwd, and SM.SessionID.
Password- This is the corresponding password used for each unique user ID.
Start Menu- Each session can have its own main menu. When a session is requested and no main menu is specifically assigned or the “(Default)” value is used, the next available session will execute the requested main menu based on the scripts and chosen transaction. If a session is requested and the next available session does have a main menu assigned, and it is not the required one, other sessions will be evaluated for a matching main menu. If one is found and available, it will be used.
Locked- The ability to lock a session means that the session can ONLY be used with the specified main menu and will not allow other main menus, even if all other available sessions are in use. For example, there are 10 pooled sessions, five locked on main menu A and five locked on main menu B. If a session with main menu A is requested and all five sessions for main menu A are currently used, the server will look to the sessions assigned to main menu B. If they are not locked, the server will take one of them. Since they are locked into main menu B, in use or otherwise, the server will wait for one of the first five to be released.
The purpose of locking a set number of sessions to a specific main menu is to ensure that there is always some bandwidth available for certain transactions. Not locking them means that they will be marked with a preference for a type of transaction (the use of a specific main menu), but will switch to another main menu when necessary.
For example, there are 10 pooled sessions available and the first five have one main menu assigned and the last five have a second main menu assigned. When a session with the second main menu is requested, the 6th session handle will be used. This is only significant because of the Locked property.
The Test Connection button will verify all settings before saving the connection. This is not required.
The Save button will save changes but will not test and verify settings.