RFgen to Oracle JD Edwards Configuration Guide
This guide covers the key concepts and steps for configuring RFgen 5.2 to connect with an Oracle JD Edwards (JDE) system that is running either onsite or offsite.
Solution Overview
A RFgen and ERP solution is comprised of:
- The “engine” provided by RFgen Mobile Development Studio or Mobile Unity Platform product
- The JDE Developer Client (Also called the JDE FAT Client)
- The connection to the RFgen Application Database (typically called "JDESuite5230.db")
- The connector to JDE's source of data (JDE DataSource)
- The enterprise connector to the JDE Business Functions (BSFN) environment
- The downloaded JDE BSFNs and JDE Processing Options
- The RFgen Thin or Fat Client (Installed on the device used to scan data and processs data via an RFgen apps)
Note that user logins are required for each type of connection and the login credential information will be required, depending on your environment setups. Check with the customer's JDE Administrator to determine if the RFgen will need to connect to JDE environment and/or any database using Named User credentials.
About the RFgen Engine
We used the Mobile Development Studio to perform our setups, but the Mobile Unity Platform Console can similarly be used as well.
RFgen ‘from the box’ will load the engine components. Obtain the most current product versions from the RFgen web site. Once installed (and tested!), the user is ready to setup the ERP-specific source dataset. When setting up a new RFgen source dataset it does not matter what your existing database type is as it can be updated post installation.
About the Connectors
To connect RFgen with the ERP database you will need to configure:
* The type of connector that will be used between RFgen and the database. Database types can be Oracle, SQL, Access etc.
* An Enterprise connection between RFgen and the JDE environment. This allows RFgen to obtain the data used in the mobile applications as well as the specific version to the business functions and process options that "manages" the data that is pulled into the mobile applications. In this guide, we setup a Demo environment.
The environments that RFgen connects to will be listed on the JDE.INI file.
METHODS OF CONNECTING TO YOUR DATASOURCE
There are two methods for configuring a connection between the RFgen server and the JDE system; they are:
* Require a Manual Login by the RFgen server. This method requires the RFgen server to log into the JDE system to validate the RFgen JDE Login/Password before a connection can be established.
This feature is enabled on RFgen when the "Require Manual Login" box is checked on the RFgen Data Source Configuration section of the Enterprise System Integration screen. The JD Edwards Login and password assigned to the RFgen must match the user information listed in the JDE Named Users group account. It also prompts the user to enter the JD Edards Login and password when the user wants to download JDE process options in RFgen release 5.2.3.5 and higher in the Connections > Download Enterprise Objects. If the JDE system rejects the login, the RFgen will not be allowed a connection to the datasource, and an error will be logged to RFgen.
* No Manual Login by the RFgen server. This method bypasses the JDE system login, and instead allows the RFgen server to connect directly to the datasource using the credentials provided on the RFgen Enterprise System Integration Connections tab of the Enterprise System Integration screen. In this case, the "Require Manual Login" box is not checked on the Enterprise System Integration screen.
JDE Business Functions and Process Options
JDE Processing Options are parameters an administrator sets up to control how applications or batch programs run. The JD Edwards Interactive Applications Version program stores these customer-defined functions in a Processing Option by version.
The applications that come from the RFgen applications database depend on some of the functionality provided by the JDE Process Options to run properly. For example, to run the Inventory Transfer program, the correct version and instance of the JDE Interactive Application Processing Option needs to be installed to the RFgen Server.
To download the correct JDE Processing Options, use the RFgen Connections > Download Enterprise Objects feature. You can also use the Find or Discover tools the narrows your search, then select and download the objects you need. Note that if you had configured your Enterprise Connector with the "Require Manual Login" box checked, to Download the Enterprise Object, manual login using the same credentials as those entered in your Enterprise System Integration screen will be required.
Alternatively, you can uncheck the "Require Manual Login" box on your Enterprise System Integration screen and bypass the login credentials in order to download objects, but this would not be recommended as it undoes the validation of credentials for the RFgen connection with the JDE system.
JDE Fat Client
Your JDE Fat Client must be installed on the same system where RFgen is setup. This will also require a JDE user ID and password that has Administrator access during the setup process. This can be modified after the setup processs has been completed.
The JDE.INI file on the system where the Fat Client is setup must be correctly setup for the JDE environment you wish to use. Pay attention to these settings as they are going to be used in the RFgen setups: Default Env, Default PathCode, Object Owner, and DatabaseName2.
Verify you have the correct versions of the JDE Toolset installed.
Normally the Object Owner and DatabaseName2 will be the same for all environments -- development (DV), test, production (PD)-- but the Default Env and the Default PathCode will not. These will be different JDE environments.
Do not mix the JDE environments.
Lastly, in some JDE environments the Object Owner may not be included. In those cases, first test the JDE connection (step 4 below) and if it is working, you may leave it blank.
About Mobile App: FADLG01000 - RFgen Configuration
This is a factory-provided application that helps set the global values for mobile applications so that the management of the values like which environment the apps should use, whether users login to Named Users or not, and other details are consolidated into one checklist.
This application is included in the JDESuite5230.db that you will be connecting. Use of this app will be the last step in configuring RFgen for JDE.
Configuration Process
1. Setup/Verify the JDE Fat Client
Before you start, setup the JDE Fat Client, and verify its functional.
<Insert JDE.INI file that lists the values to be used for all the other screen shots here>
2. Obtain the RFgen database for JDE.
The most current version of the RFgen JDE database is always available from the support team at RFgen (support@rfgen.com) for all users and partners currently under a support contract. This will consist of a single database. This database needs to be loaded onto the users RFgen system and place into a folder where the RFgen admin will have read/write privileges. For new customers, all of these steps are normally completed by your RFgen consultant.
3. Set the RFgen Application Database.
Select Configuration > Application Database from the Mobile Development Studio menu. Your display may look different from the image below.

Configuration File: Provide a new configuration file name by selecting the ‘+’ sign. We recommend a name that has some type of meaning. In this case we will use ‘JDE Test’
System/Company Id: Place an appropriate name into this field. A RFgen Partner might place their customer’s ID or name into this field. In this example we will use ‘RFgen Cass’.
Encryption Key: Do not setup an encryption key at this time as your starting environment is not encrypted.
System Database: Select the database type. Currently we are releasing our starting databases as .db datasets, so select SQLite.
Data Access Mode: Can be Static or Dynamic. Use the default "Static."
SQLite Database: Select the RFgen Application Database from Step 1.
Leave the other settings defaulted.
Session Timeout (hr): This will disconnect and reconnect to the ERP at the specified interval. This may be required if the ERP is configured to disallow a connection that never times out. The default is 0 hours.
Click Test Connection. If the “Connection successful” message displays, click OK to exit the message, then click OK to save changes.

At this point RFgen will attempt to make the following connections for:
- RFgen DB(This is the database of RFgen applications.)
- RFgenTM (This is the optional transaction manager.)
- JDE (This is the Enterprise connector for the JDE environment.)
- JDE_DEMO (This is the database that holds the sources of data used in an RFgen application.)
Since our setup is still incomplete, the connection status icon displays a warning.

4. Set the Enterprise Connector.
a. From the menu select Connections > Add New Enterprise Connection > Add New ERP System Connection from the menu.
b. Change the Enterprise Type to JD Edwards Enterprise One.
(Note: If you were upgrading or already had a connection to JDE, the JDE Connection would be listed in the Connections menu.)
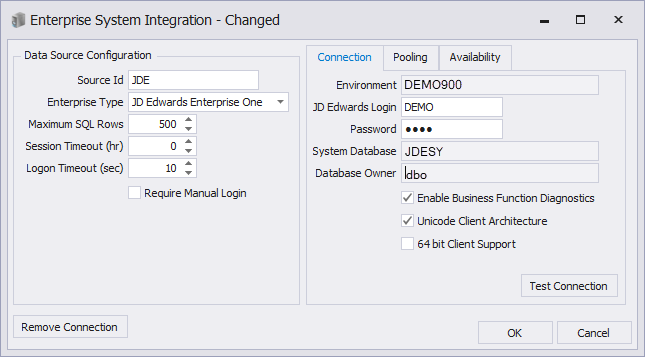
c. Set the values as described below.
Data Source Configuration
Source Id: For JD Edwards, please leave this value as ‘JDE’.
Enterprise Type: For JDE Enterprise environments, leave the value as ‘JD Edwards Enterprise One’.
Maximum SQL Rows, Session Timeout, and Logon Timeout: User the defaults 500, 0, and 10. These settings can be changed later.
Require Manual Login: Check this box if you have Named Users (uses who are licensed to use the product). Members of a Named User group must login first before the entity (in this case, the RFgen server) is allowed to connect with the system database listed on the Connection tab of the Enterprise System Integration screen. The decision to have this checked should be determined by the JDE Admin.
(In our setup example for a Demo environment, we didn't check it because we don't have Named Users.)
Connection tab
Environment: The value for this field is pulled automatically from the value listed under Default Env in the JDE.INI file if the JDE.INI is setup and installed properly. The environment name cannot be changed from the RFgen screen.
JD Edwards Login and Password: Enter the credentials used by the JDE Administrator during the original install for the JDE Fat Client. This may be changed later. Note that if you had checked the "Required Manual Login" for your own environment, then the credentials need to match the credentials from the Named Users Group.
System Database and Database Owner: These are pulled from the customer's JDE.INI file and cannot be changed.
Enable Business Function Diagnostics: The value should be checked by default.
Unicode Client Architecture: The value should be checked by default.
64 Client Support: This value should be checked only if you are using the 64 bit version of the JDE Fat Client. In our example, we were using the 32 bit version of the JDE Fat Client and therefore this box was unchecked.
d. Test and Save. Selecting the ‘Test Connection’ button will connect to the user’s JDE system using the JDE Development Client (aka JDE FAT client) that was installed on the system. If you receive the ‘Connection successful’ message, click OK to exit the message, then select the OK button to save the change.
5. Set the Connector for Database Type
Select Enterprise Connections > JDE_DEMO from the menu.

The Source Id: Is the name you wish to use.
The Database Type: Enter/select the same type used by the customer’s JDE Development client database connection to JDE.
Data Access Mode:
The Data Source needs to be correctly entered based on the customer’s JDE Development client database connection information.
The specific questions will differ based on the database type selected. Most common for JDE is either an ODBC connection (as noted above) or an Oracle connection. Contact your JDE database administrator and/or your Oracle administrator for this information.
To validate your settings, click Test Connection. After the “Connection successful” message displays, click on the Indexing tab. As JDE contains multiple databases, select the JD Edwards Environment checkbox first.

… then the Discovery icon. This will list the JDE datasets. After the list is populated, select the Index icon, which will index those datasets to allow RFgen to quickly read the JDE data. Upon completion, click the OK button save the change. The footer should show both connections valid.

6. Download JDE BSNFs and Processing Options
Load the JDE BSNFs (Business Functions)
a. Select Enterprise Connections > Download Enterprise Objectsfrom the menu.
b. Select Data Source: JDE, then select, Object Type: Business Functions.
c. Tap the Discover Objects icon.

This will open JDE and pull all of the JDE BSNFs from the customer's JDE-connected JDE environment. Upon completion, the system will show all BSNFs in alphabetical order. In the example below, note the ABAccountBalance item contains a small disk icon.

This disk icon shows that this BSNF is one currently used by
your RFgen environment.
For the original setup, select the Show OnFile icon.

With ONLY THOSE ONFILE SHOWING, click the Select All icon, which checkmarks all the listed items. Next, select the Download Schema icon. This will update RFgen to match the current JDE BSFNs.
Note: This step should be completed with each JD Edwards new release, or anytime an effected BSFN is changed by JDE.
Load JDE Processing Options
a. Select the menu item Enterprise Connections | Download Enterprise Objects.
b. Select Data Source: JDE and Object Type: Processing Options.
c. Click the Discovery Object icon.

This will open JDE and pull all of the Processing Options from the customers JDE connected JDE environment. Upon completion, the system will show these in alphabetical order.
With ONLY THOSE ONFILE SHOWING, click the Select All icon, which will checkmark all the listed items. Next, select the Download Schema icon. This will update RFgen to match the current JDE Processing Options. This step should be completed with each JD Edwards new release, or anytime an effected processing option is changed by JDE.
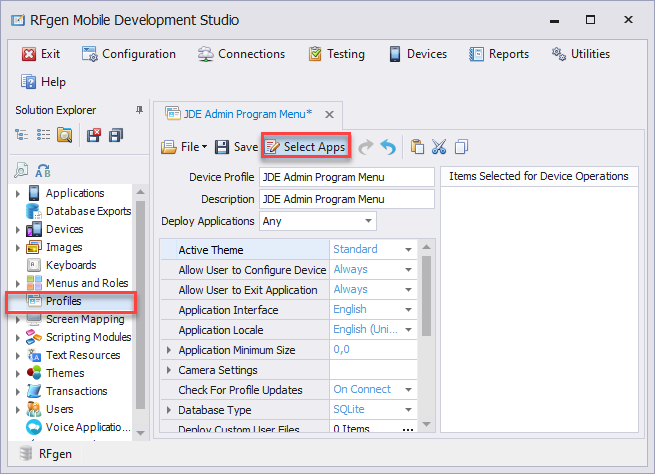
7. Deploy a Profile to a Desktop Client
Requires:
* Connection with JDESuite5230.db
* Installation of a RFgen Client -- For details, see the RFgen Desktop Client Install Guide.
* Installation of the Profile that include all the JDE ADM applications -- For details, see To Create a Profile
Create your profile with these settings:

8. Launch the FADLG0100 - RFgen Configuration App from your desktop
This section reviews the Administrative application that comes from RFgen's database of applications for JDE. This process is only needed for initial setup of JDE customer for RFgen or when modifications are made. The best way to view this is application and its many options is through the RFgen Desktop Client.
Note: RFgen comes preset with the Setup Admin user ID of ‘adm’ and no password. We highly recommend that this password be changed if using this on a production system.
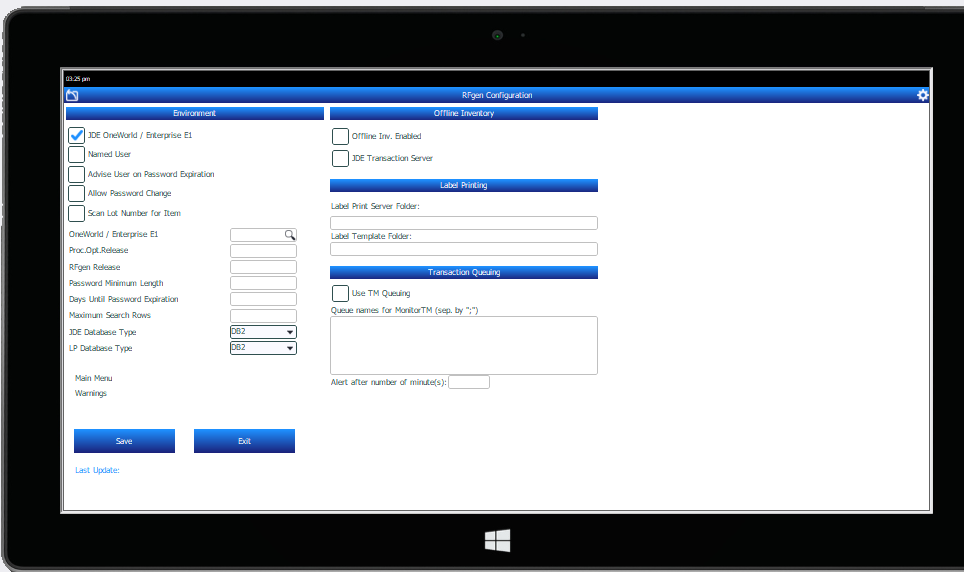
a. Sign in. Sign into RFgen using the RFgen Desktop Client and the id of ‘adm’. Note that RFgen contains many optional features such as Offline Inventory, Licensing Plating, Warehouse Director and Vocollect voice processing. Also included are some shortcuts to setup items like the JDE Fiscal Date Patterns or access to special processing option setups.
b. Configure RFgen Administrative Details.
This section must be complete for all setups. Once completed, it does not need to be re-visited unless one of the basic items (as noted below) needs to be modified.
Maintain Log Level: RFgen provides an abundance of information – which generally you will not need (and will not want unless you have truly unlimited disk space). For standard usage, set to capture only Errors. No capturing should be set for Print labels unless you are having issues.

Log Scanning Versus Typing: This determines what happens when a scan takes place while inside RFgen. If this is changed from the below default, you will need to perform additional coding across your existing RFgen codebase.

Environment: This controls many RFgen setup items for JDE functions.

OneWorld / Enterprise E1. This displays the JDE version being used. Versions from World A.7.3 up to EnterpriseOne 9.2 can be selected.
Proc.Opt.Release. This displays the Processing Options version being use. In most cases when the OneWorld / Enterprise E1 selection is made, this option will automatically select the correct Processing Option version.
JDE OneWorld / Enterprise E1 checkbox. Click this ON if using any version of OneWorld.
Named User. Check this ON if RFgen is using JDE Names users.
Days Until Passw. Exp through Allow Password Change. If not using the Oracle Security Server and/or JDE Named Users, this allows the admin to setup various security options. If using Oracle Security Server and/or JDE Names users, these settings have no value.
RFgen Release: This is the release version of RFgen that is in use.
JDE Database Type and LP Database type: Because SQL syntax can be a bit different, this is a flag setup so RFgen knowns which syntax to validate against. This is generally only needed for some of the RFgen optional elements.
LP Commitment Control. This flag is used only if the customer is utilizing the RFgen Licensing Plating option.
Transaction Queuing. This section is used only for RFgen versions earlier than 4.1. After 4.1, the newer transaction queuing was added to RFgen, and this section was no longer applicable.

The SAVE button is clicked when saving any changes to this screen. The last user, date, time will be tracked.

Custom User Profiles. This provides a method to build unique user profiles. This is generally no longer needed with the current RFgen versions and with today’s hand-held devices.

Email Setup: While most customers sending email from RFgen have multiple requirements based on user IDs, transaction name, etc., for those needing only a single email address set, the defaulted data can be setup here.

Offline Inventory. This is where the user would enable offline inventory and advise if using the JDE transaction server.

Label Printing. For label printing, RFgen needs to know the location of the label print server, as well as the location of the label template folder.

Appearance. These can be modified as needed and will control the listed item. For example, if your locations required a 20-character input, this would need to be modified. Of importance, these are defaults only, and are often over-ridden inside the actual codebase to meet the needs of that specific transaction and/or based on the JDE data definitions.

You are now done with setting up standard, administrative items.